Header Navigation Bar

Sunday, October 26, 2014

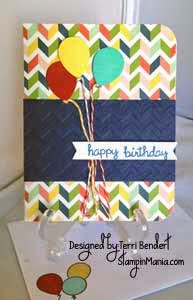
Happy Birthday Balloons

Hi Crafters,

Wow - it's been awhile since I've posted on this blog. Sorry about that. I was trying to figure out which one was the best, the one on WordPress that is associated to my website, StampinMania.com; or this one.  This one is DEFINITELY easier to use. I've had tons of website issues so it's been a bit challenging. If you are missing some of my tutorials and posts be sure to follow me on Facebook.com/StampinMania.

I'm also on You Tube - as StampinMania. I haven't done as many video tutorials as I would like to since we are still in a rental waiting on them to finish our house. Ughhh - long story - Not fun, and no good place to get away from family for videos. The house is a few months behind so I'm feeling sorry for myself - ha.

well, today I made two cards pretty much the same, just use different paper. These are great birthday cards that will work for any age.

 I love the paper from Carta Bella "It's a Celebration" we have the 6x6 paper pads as well as the 12x12 collection kits.

Supplies Used:
Balloon Dies by Paper Smooches
Sentiment Strips Dies by Die-Namics
and the sentiment was from the Stamp Set "Happy Everything" by Lawn Fawn.

Click on any of the supplies named above to go straight to the website.  Use COUPON Code: Balloon to get 25% off your total order. Coupon expires Nov 15, 2014, good on any regular priced items.
Thanks for stopping by. Join us on your favorite Social Media sites: Facebook; Twitter; Pinterest; and You Tube.
Have a blessed day and happy crafting.
Terri

Sunday, April 13, 2014

Botanical Tea from Graphic 45

Hi Crafters,
Today is the first time I've used Graphic 45 paper and it is fan-tab-u-lous! I made this tag and a card. The tag is not the normal size tag (which is a #8 tag) it is a #10 tag. You need to use a larger tag when you are using the Prima Doll stamps from Prima, which of course I love. The problem is I LOVE it ALL.  Since my store is new and small I can't stock everything so I just stock stuff I LOVE....this could be a problem - ha!

My question is: ok, these tags are SUPER fun to make but what on earth do I do with them when I'm done????
Tag: Botanical Tea paper & embellishments; I used a metal dragon fly from Metal Works, and raffia for the tie. I stamped on the Botanical Tea paper and fussy cut the skirt out.  The boots and hair were colored with Inktense Pencils - which are incredible. I keep practicing to get better but they are so much easier for me to blend than with alcohol markers and copics. 

Card: Botanical Tea die cut banners, twine, and a die from Memory Box. Such an easy fast card. You can't go wrong with banners. 

Thanks for stopping by and happy crafty !!!

Follow us on Twitter, Facebook, Pinterest, & YouTube.

Terri


Saturday, April 12, 2014

Chalk Studio by My Minds Eye

Hi Crafters,
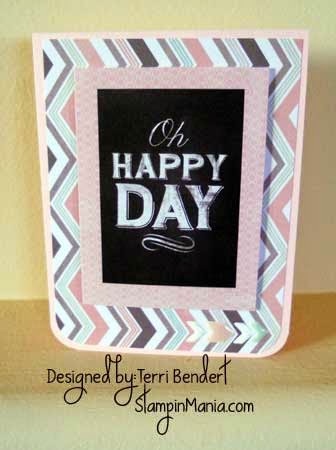
One of my favorite design company is My Minds Eye - great quality, great design & color. I just hope my business gets a little larger so I can carry ALL of their lines. Here are the projects I created today using the Chalk Studio line today. For my friends who don't like to stamp - take note, These are non-stamping projects. I used the papers and embellishments from the line and a couple of items, like clear wink of stella - that is a crafter's MUST HAVE.  I love how it gives shimmer to everything.


Thanks for stopping by. Be sure to follow us on Twitter, Facebook, Pinterest, and YouTube.

Use coupon code "scooter" thru the month of April for 20% off your total purchase (sale items excluded). Offer expires the end of April.

Oh wait, duh - here's the Chalk Studio product review video I made this morning. Enjoy

Friday, April 11, 2014

Shiny and watercolor paper Thank You card

Hi Crafters.

I used Hero Arts Daubers on water color paper to make the background. If you don't have the daubers you can use the shadow ink ink pads and swipe them over the paper and then spritz with water. I have 3 pics so you can get a close up of the embossing elements.


 Instructions:
1. Swipe daubers (Hero Arts) diagonal over watercolor paper then spritz with water.
2. Use a heat tool to help set it faster
3. Stamp swirl images with versamark then emboss with Holographic embossing powder
4. Stamp the flowers in versamark then emboss with Judikins Egyptian Gold embossing powder
5. Add Ribbon
6. Emboss sentiment with white embossing powder then die cut out

Stamp sets used: Darcies Fleurs Abondante; sentiment is from one of my FAVORITE stamp & die sets Sizzix Phrases - it has 12 different size dies for sentiments - love it.

Check out StampinMania.com for stamping needs.

Thanks so much for stopping by, use coupon code 'scooter' to get 20% off your total purchase for the month of April. (sale items excluded)

Follow us on Twitter, Facebook, Pinterest, and YouTube.

Have a super crafty day,
Terri


Scootin' on By....love this new stamp set

Hi Crafters,

How cute is this scooter? I made this card last night using some new stamps and dies we got in at the store. Spiffy Scooter by Paper Smooches. Use coupon code 'scooter' to save 20% on your total purchase thru April 2014, at StampinMania.com


Thanks for stopping by - - - be sure to go to StampinMania.Com to use your 20% off coupon on your entire purchase with coupon code 'scooter'  good thru end of April 2014 (sale items excluded)

Be sure to follow us on Facebook, Pinterest, YouTube, and Twitter.
Join our newsletter for specials, tutorials, and special event information.

Thanks, Craft On
Terri


Sunday, April 6, 2014

Inktense Pencil Color Chart

Hi Crafters – many of you know, I LOVE LOVE LOVE LOVE the Derwent Inktense pencils; however, when I look at the colors I don’t always know WHAT color I am going to end up with. I normally scribble on a scrap to figure it out. I finally got smart and this morning I just made a color chart. I used watercolor paper but you could do this on any good quality heavy cardstock.

1. Lightly color an area, add water (either with a water brush or paint brush)
2. Dry (it doesn’t take long since it’s ink it dries fast. However, I’m always in a hurry so I just shot it with a heat tool for a couple seconds)
3. Use a Sharpie black marker to label the color – Voila – Color Chart….So why did it take me so long to think of that – ha.


Follow us on Facebook, Pinterest, Twitter, and YouTube.
StampinMania.com 

Thanks for stopping. 

Sunday, March 9, 2014

Happy Birthday with Balloons

HI Crafters, I hope you are all doing well and hopefully enjoying a little sun today. Here in Ohio the sun sightings have been rare.  So of course, I'm feeling crafty on a day that is sunny, thus I am in my craft room instead of enjoying the sun. After this post I think I'll at least go look at it !!

Here is a fairly simple birthday card. The reason I say fairly is because the die cut letters for the Happy Birthday, while they are cute, they are small and fragile. Gluing them was a little tedious. It's a new set of dies we just got in from Paper Smooches called Birthday Words. Several words come in the set. If I was smart I would have run them through my Xyron and made stickers out of them, but of course I JUST NOW thought of that - ha. Too late.

One way to add a little interest to a card is to make a hand-written border like I've done here. When you do a 'wonky' border it's super easy because you don't have to worry about being perfectly straight. Enjoy,

Thanks for stopping by
Please consider visiting StampinMania.com for your paper-crafting needs. Also be sure to sign up for our newsletter (when you do be sure to add us to your contacts).  You can also find us on Twitter, Pinterest, Facebook, and YouTube.

Happy Crafting.

Sunday, February 23, 2014

Be-You-tiful Tag

Hi Crafters - I'm addicted to tags these days. While most of you are into cards, I realize that, but let me tell you, once you get playing with tags you will be hooked like me. Mine don't always turn out very good, I'm a newbie, but  sure do enjoy them. Here's one I made this evening. I used distressed inks, whitewash stain, and black ink. It's just fun to play around and see what you end up with. I'm going to do a Tag swap, like a card swap in March. If you are interested in participating leave a comment and I'll contact you when we're ready to go.

Thanks for stopping by. Visit my new online scrapbook store StampinMania, a small business with a big heart...just enjoying creativity.

Have a craft-tastic day


Here's a little closer look . You can see the areas where I used whitewash stain - sooo fun

Follow us on Twitter @StampiunMania;  Facebook- facebook.com/StampinMania; Pinterest - StampinMania and YouTube - StampinMania.

Sunday, February 16, 2014

Thank You Card

I don't know about you but I'm pretty much OVER winter. This is the most snow we've had here in Ohio since I moved here 15 years ago.  So needless to say I was playing in my craft room today. Here's one of the cards I made using some of my favorite products.

 I think one of my favorite die sets is the one I used for this card. It's from Die-Namics (MFT) and it's the  Traditional Tag Stax click to see at the store. I love love love love this die set.
This card was pretty easy. I used watermark ink (versamark) for the flowers then embossed them with white embossing powder.  The two strips of tape behind the tag is from the Fancy Pants Memories Captured collection, it's their Tape Stickers. I love the colors in this collection. Check it out by clicking here - Tape Stickers
The stamp set I used is from Basic Grey called Sugar Rush - click here to see it
I just used a black pen to draw the line to frame the card. I did it free hand to intentionally have a little wave in the lines. Sometimes I use a ruler to make them perfectly straight.
I thought about putting 3 black enamel dots on the lower right-hand corner but decided this might be the time where 'less is more' - what do you think? Would you have gone ahead and added the enamel dots?
I hope you are having a craft-tastic day
Be sure to stop by the store and check out some of our great products, visit the clearance section for super savings.
Follow us on Twitter, Facebook, YouTube, and Pinterest.
Thanks for Stopping By.

Terri

Sunday, February 9, 2014

Love You Card

Hi Crafters; today I made card using embossing and Wink of Stella Glitter Markers - LUV Them ! Below is the card and while it's February and everyone thinks of Valentines this card works for Valentines, Birthday, Anniversary, etc.  The stamp set I used has some great stamps that would work well on scrapbook pages as well. Enjoy


Supplies Used - can be found at StampinMania.com. Be sure to use coupon code "videofeb" for 15% off your entire order (sale items excluded from additional discounts.  Coupon expires 02/28/14)


Hope you enjoyed the video. Leave me a comment and tell me what types of other things you'd like to see. Also be sure to follow us on all our social media sites:

Pinterest - StampinMania
Twitter - @StampinMania
Facebook - facebook.com/stampinmania
YouTube - StampinMania

Sunday, February 2, 2014

Fun Technique using Ink Resist & Acrylic Paint

Hi Crafters,
Wow - I drug out the acrylic paint today. I don't know what got into me - ha. I was just in the mood to do something I hadn't messed with for awhile. This technique is easy and fun. You can do smaller tags with this technique to put on card fronts, use the standard size tag (the one in the video) for scrapbook pages, or just for doing a tag. Tags are so popular right now and many of them are super Artsy - I don't have that kind of talent but if you check out tags on pinterest you will be amazed !!! This one, fairly simple. The video is just for the technique so the finished tag was not completed during the video.


The Video 


Supplies Used that you can get at StampinMania.com  Use Coupon Code "videofeb" for 15% off your total purchase (sale, clearance, & events excluded. Coupon expires Feb 28, 2014 at 11:59 p.m. Eastern) 


Happy Crafting...Go to our Member Group at Flickr - join the group and upload your creations to share, we'd love to see what all you are making. Click here to join the group.

Saturday, February 1, 2014

My Mind's Eye - Cupid's Arrow

Hi Crafters,
I don't think you can get a card much easier than this. You can make it in 5 minutes if you leave off the die cut hearts on the bottom (red and black) and if you include the hearts you can do it in 10 minutes. That's still stinkin' FAST. I don't even think I'll do a video on this one it's so easy. But I think it's super cute.


The card base is Doodlebug Textured Cardstock - Ruby
The layer with the Love on it is straight from the MME Cupid's Arrow 6x6 paper pack cut down to 5 1/4 x 4"
The heart banners on the left are just paper cut from the 6x6 pad and then cut in strips to make banners.
The red & black hearts that are die cut are from Lawn Fawn's Hearts Dies set then I covered then with a clear Wink of Stella pen.
Click items below to see them in the store.

MME - Cupid's Arrow 6x6 Paper Pad
Lawn Fawn - Hearts Dies
Wink of Stella - Clear

Happy Crafting


Sunday, January 26, 2014

Happy Hello' Card

Hi Crafters. This is actually a video I made on the 18th and I just realized I didn't post it. I put the video on YouTube but failed to make an actual blog post out of it. So, here's a SUPER EASY card and believe it or not, there is NO STAMPING on it. Now that's rare for me.

Supplies Used:
The paper is from the Teresa Collins You are My Happy collection.  I used the 6x6 pad for the layered designer piece then I used a piece from the 12x12 collection kit for the circles. The circles are on a page called "Memo Circles" and I LOVE LOVE LOVE them.
To get the circles cut out I used my Sizzix circle dies set, which fit perfect. I simply cut the 12x12 paper down and used my bigshot and the Sizzix dies to cut out the circles. It was fast and easy so I ended up just cutting out half the page of circles so I would have some available the next time I wanted to use them. Here's the full 12x12 sheet image.

Isn't this paper just YUMMY. I love the colors, the designs, and pretty much everything about it. 

The die set used was the Happy Hellos from My Favorite Things Die-Namics - awesome die set ! After I die cut the hellos  out I ran them through my Xyron sticker maker to make it easier to adhere. Check out the video for all the details.

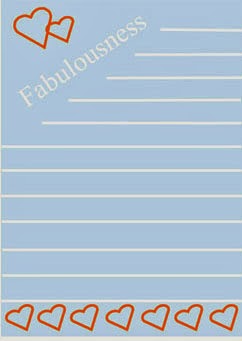
Free Printable - Banners & Flowers Journal Page

Hi Crafters - Ok, as I mentioned earlier and as you can tell from my last couple of posts - I'm addicted to learning how to create printables that I can share with you. Which sounds good - but, I've received several new items for the store and I should be making samples and videos to share with you of those items ;-) so as soon as I get this uploaded I am off to do that. I got some super cute valentines paper in and I am dying to get crafty with.


I created this to fit the Filofax A5 but you can easily pull the picture into a word document and resize it to meet whatever your needs are. This would be a cute journal card for a scrapbook, SMASH book, junk journal or just about any paper-crafting project you are working on .

The image below has my signature but the image that you download will NOT.  Click on the Image below and it will take you to my drop.box where you can download the printable for Free.

 Click here for Free Printable


Once you get to the download you will need to click the Arrow in the menu area of box.com to save the image.

Happy Crafting....I hope you have a super day
Terri

Saturday, January 18, 2014

Journaling Cards - Free Printables

Ok, now that I have learned HOW to make printables that's all I want to do. Bare with me I'm sure it will wear off in a few days - ha.  Print these out on your favorite cardstock. Great for SMASH books, Junk Journals, Scrapbook pages, and pretty much any of your paper crafting projects. Enjoy

Journaling Card Printables - FREE

Once you get to the download you will need to click the Arrow in the menu area of box.com to save the image.


Free Printable

Hi Crafters, 
I made my first printable. It was so fun. I will be making more printables that will work great with your Filofax, Daytimer, Planners, SMASH Books, Layouts, and Cards. Pretty much printables that will work with any of your paper crafting projects. The size of this one is 5- 7/8" x 8- 1/4". For a sturdier usable in your filofax it works best if you print it out on cardstock or photo paper.  Happy Crafting. Please leave feedback as to whether or not you liked this and would like to see more free printables for your crafting fun.   Click the image below to access and download. 
           Enjoy
 Free A5 Printable

Once you get to the download you will need to click the Arrow in the menu area of box.com to save the image.

Brought to you by StampinMania.com  Check us out for your paper crafting needs. A new online paper crafting store. Starting out small but with a big heart. Follow us on Twitter, Facebook, Pinterest, & Youtube.

Saturday, January 11, 2014

I Heart You

Hi Crafters,
How has everyone been doing? I've been busssyyyy, as I'm sure you have too. Keeping up with all the social media for StampinMania is a full-time job - I love it, I just need more time.  Make sure to follow us on our YouTube channel because I try to post videos there at least once a week. My New Years resolution is 2-3 times a week. I need days that are 36 hours long - ha.
Today's card is pretty easy and I tried to do it 'quickly'. I should take a vote, some of my friends say my videos are too long. I try shortening them but man, it's hard. Today's I think I did pretty good !!!
I love the Holographic embossing powder by Ranger.  It's like clear embossing powder but with TONS of shiny glitter.

Click on the picture to go to our YouTube Channel to watch the video on how to make this card - ENJOY
 click here to see how to video

Supplies Used:
Sizzix Heart Dies (Set of 6)
Avery Elle - Aim High Stamp Set
Paper Smooches - Primary stamp set
Ranger Holographic Embossing Powder
Memento Ink - Rose Bud & Tuxedo Black
Hero Arts Ink - Tide Pool
Heat Tool
Remember to follow us on:
Facebook.com/StampinMania
YouTube 
Pinterest
Twitter
AND - join our FLIKR group where you can post your own creations to share with stampinmania fans. Click here to join FLIKR